Graveyard Pudding Cups
These Graveyard Cups are always a hit for Halloween!
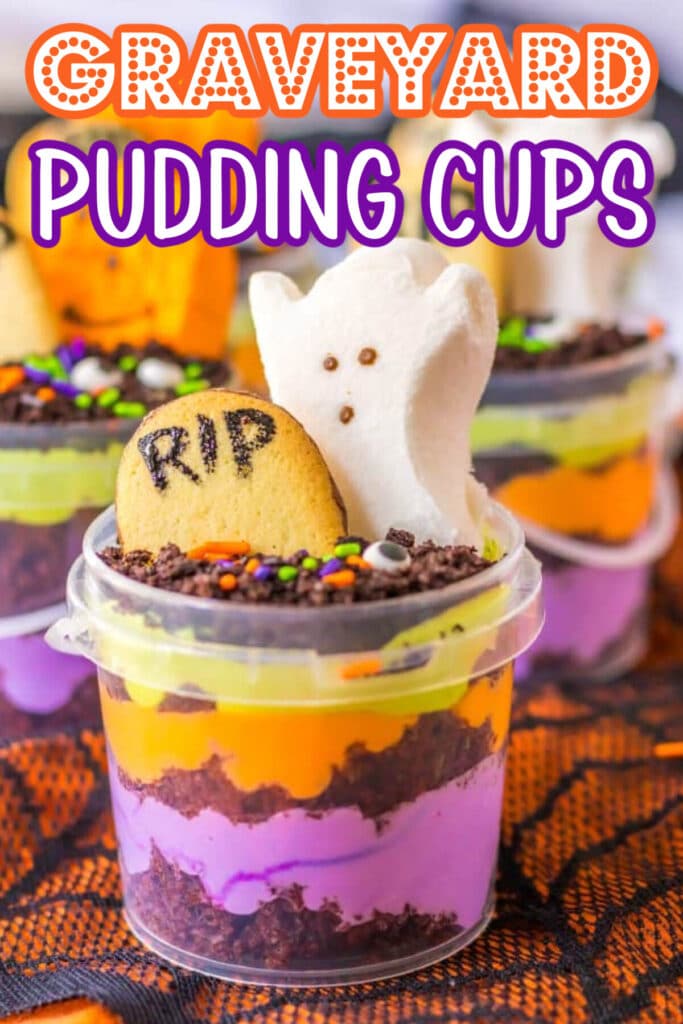
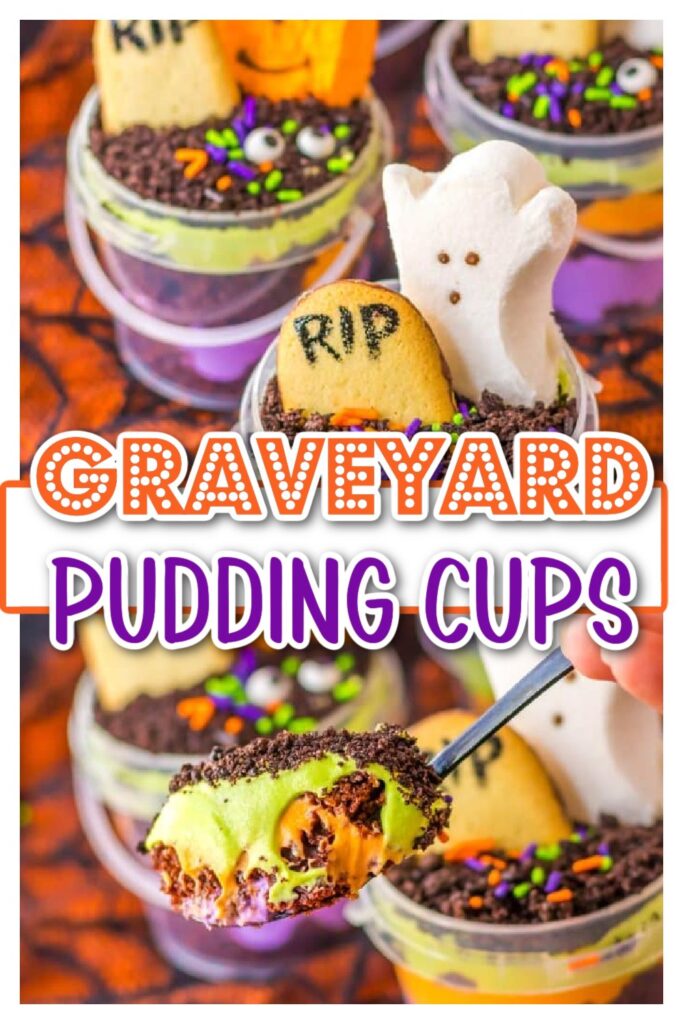
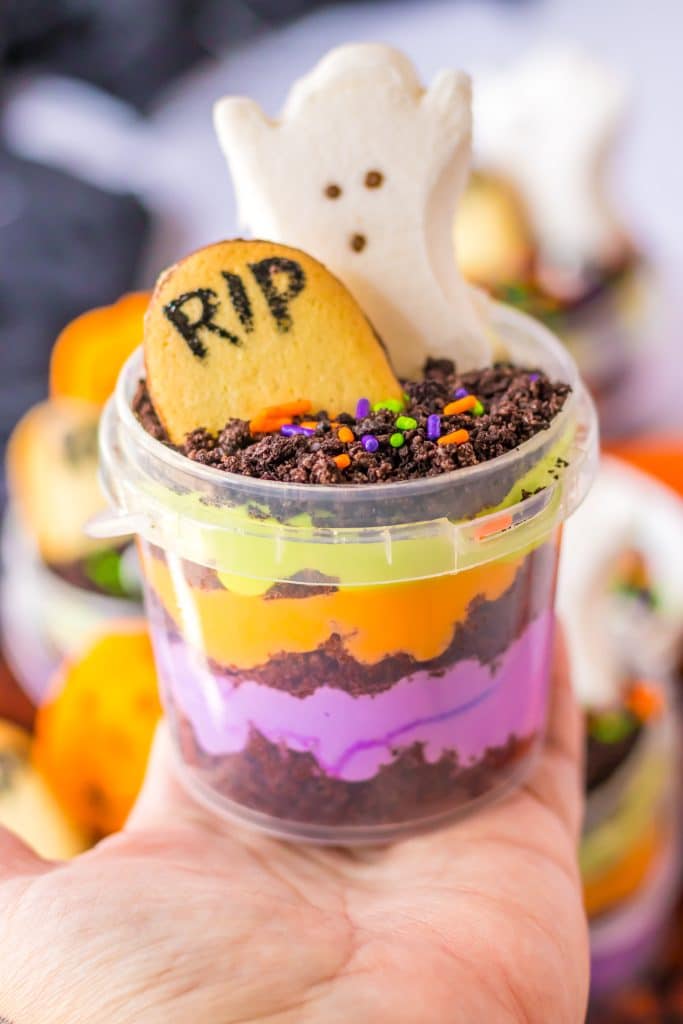
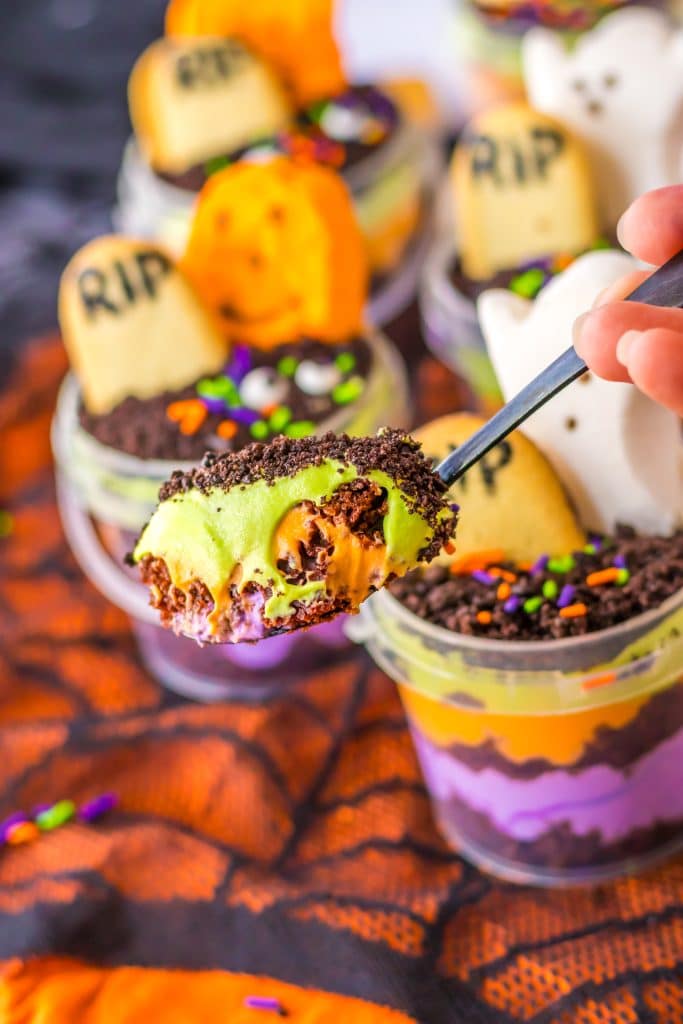
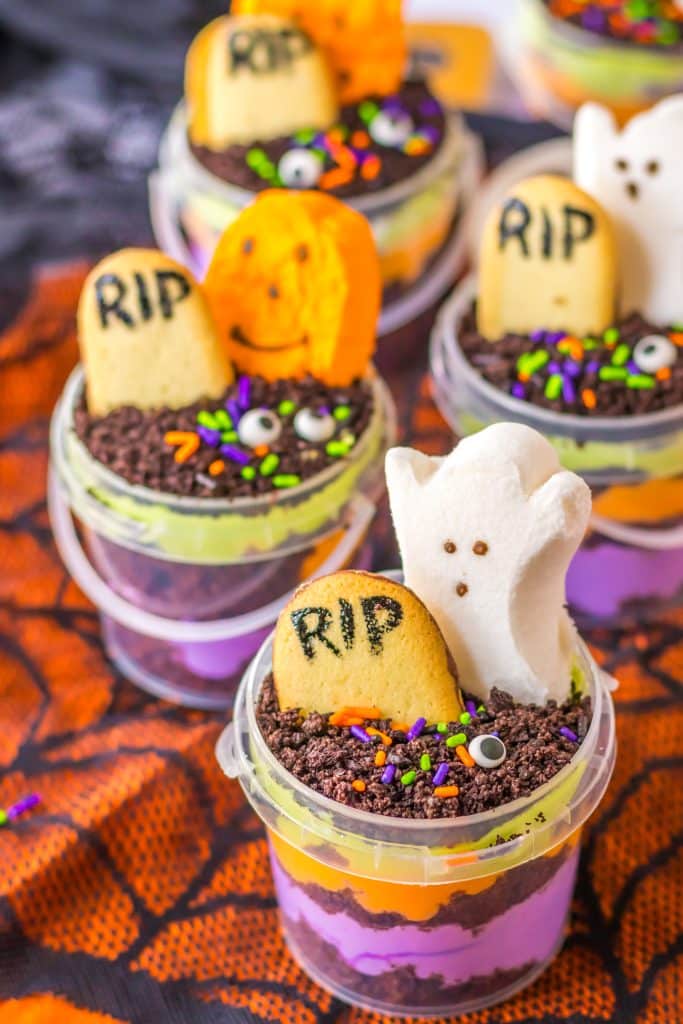
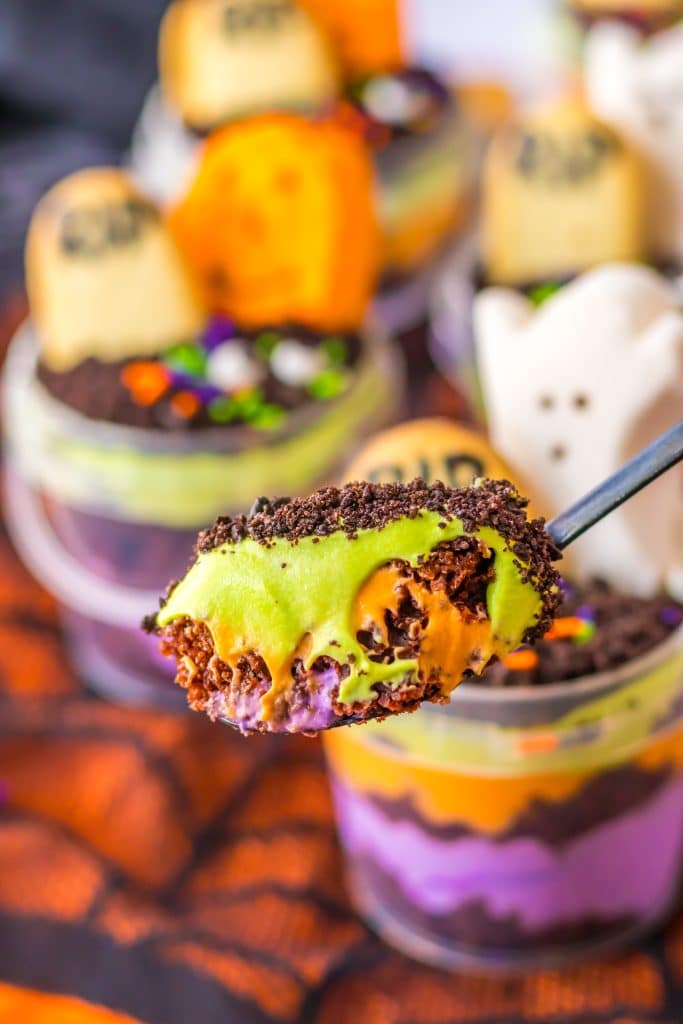
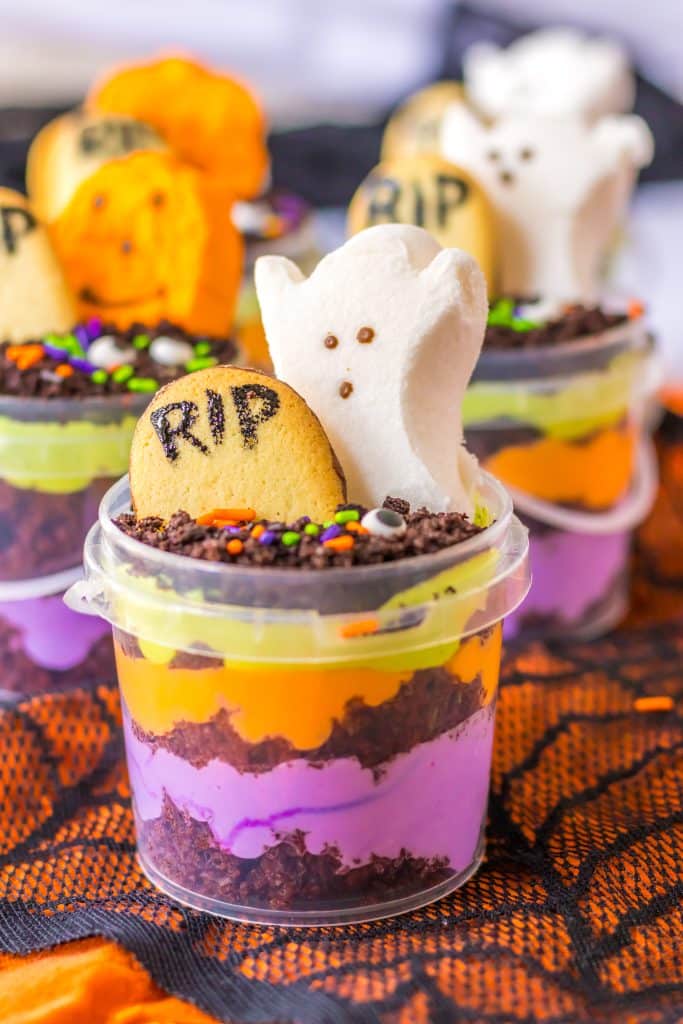
These Graveyard Pudding Cups are so cute and spooky for Halloween! Devil’s food cake mix gets layered with brightly colored white chocolate pudding before getting topped with crushed cookies for graveyard dirt and some spooky gravestones. Kids will love helping with this one and everyone will love eating them! Perfect to make ahead.
There is nothing I love more an easy Halloween dessert that the kids will love and these little dessert cups are perfect. I love that I can make them ahead of time and just keep them in the fridge anytime the kids start asking for a spooky snack.
These come together so quickly and are super customizable. You can use your favorite cake, favorite flavor pudding, and decorate them however you like. The kids really love to help with these. You get an activity for the kids and a delicious dessert, what more could you ask for on a chilly Halloween night.
These adorable Halloween desserts layer devils food cake with white chocolate pudding dyed Halloween colors. Then you top it with crushed up cookies to resemble graveyard dirt. You just decorate it with little cookie gravestones and some other spooky treats.
These are so delicious and great for Halloween parties and get-togethers! Perfect for a scary movie night or dessert after a night of trick or treating.
Next time you want a kid-friendly spooky dessert that everyone will love just whip up a batch of these and everyone will be happy!
I promise these Graveyard Pudding Cups will be your favorite dessert this Halloween season!
You will want to make this dessert again and again! We do!
WHY THIS RECIPE WORKS
- Easy and fast.
- Family-friendly.
- Perfect for Halloween.
- Kid favorite.
- Delicious dessert.
I used these little buckets and they were perfect! Get them here —> Buckets
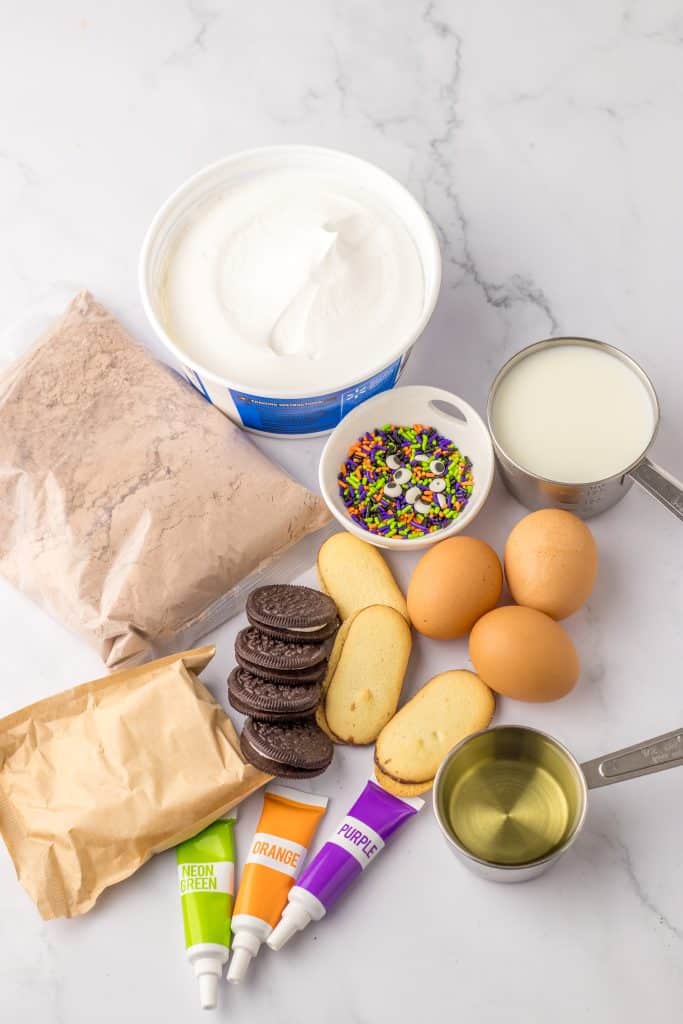
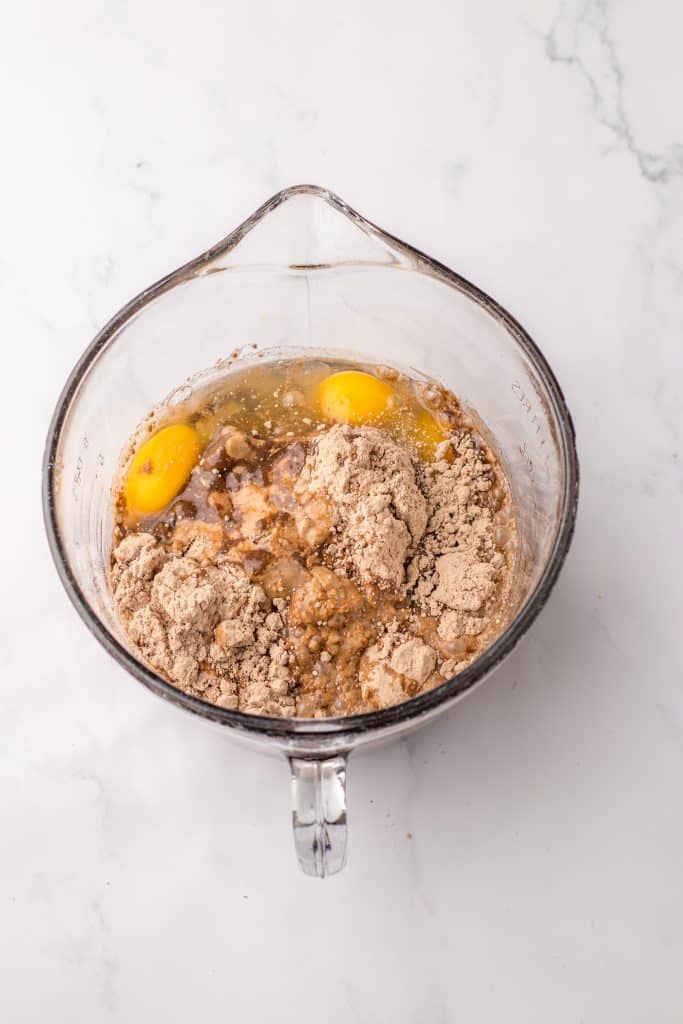
Gather your ingredients.
Make your cake batter.
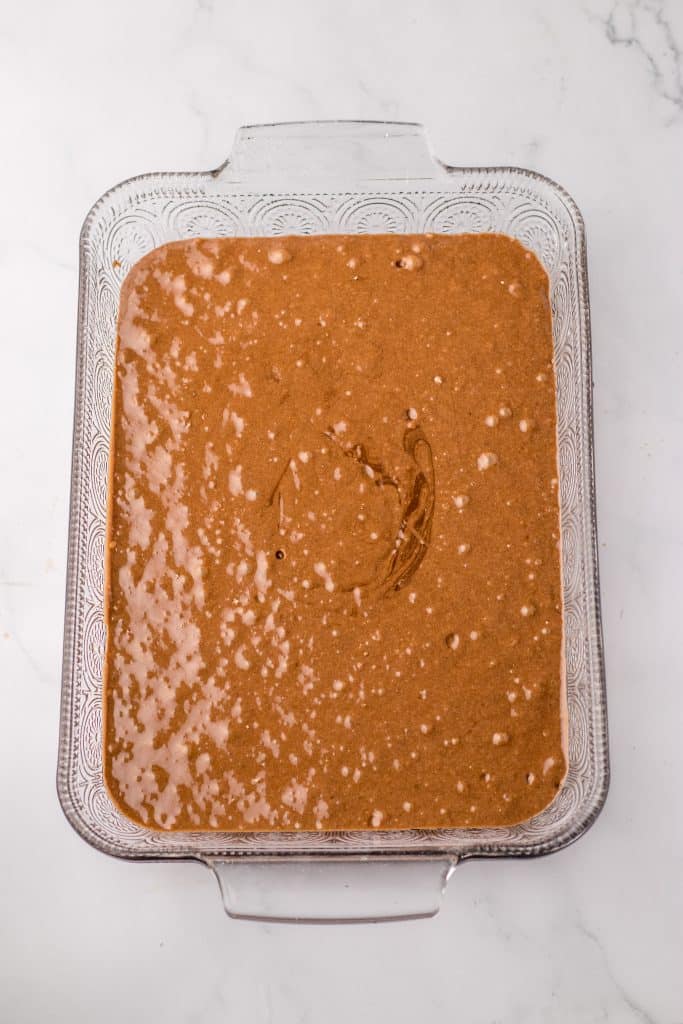
Pour into pan to bake.
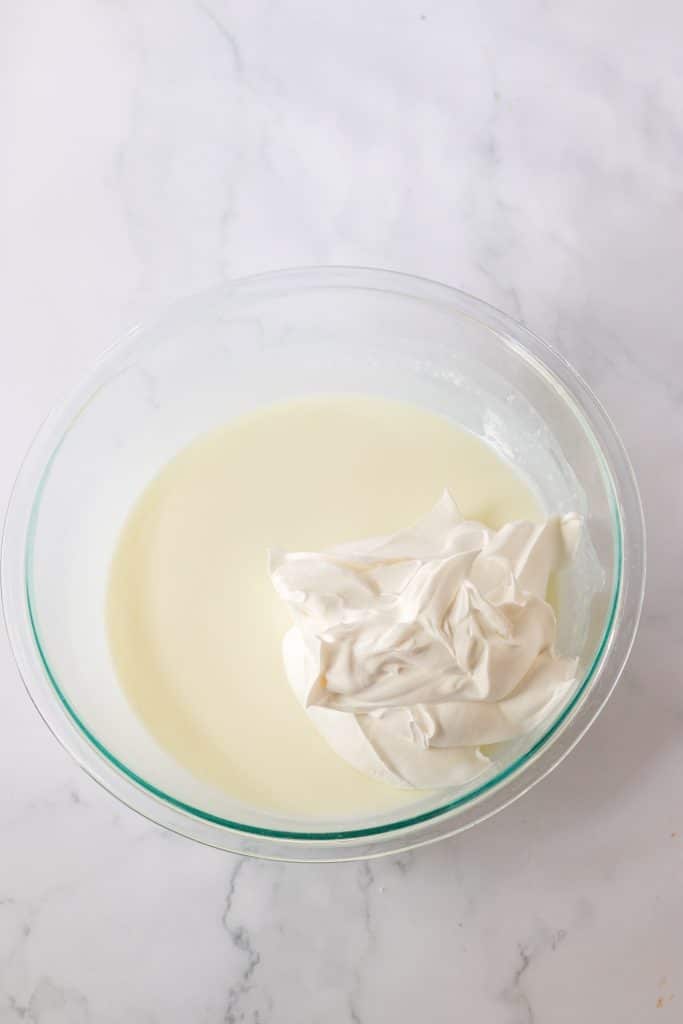
Mix up your pudding layer.
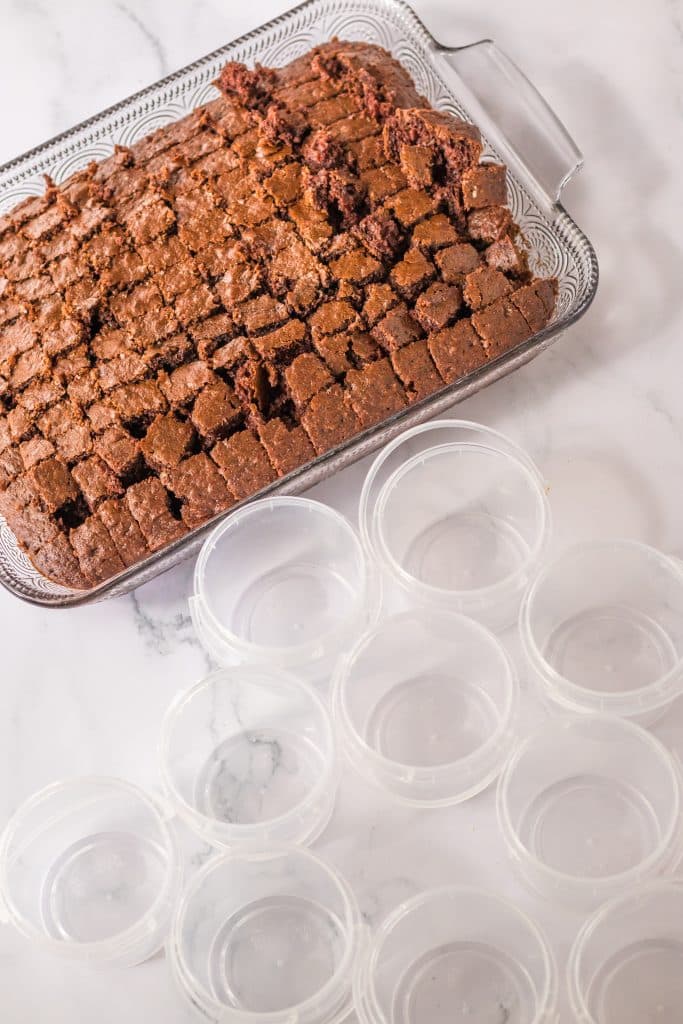
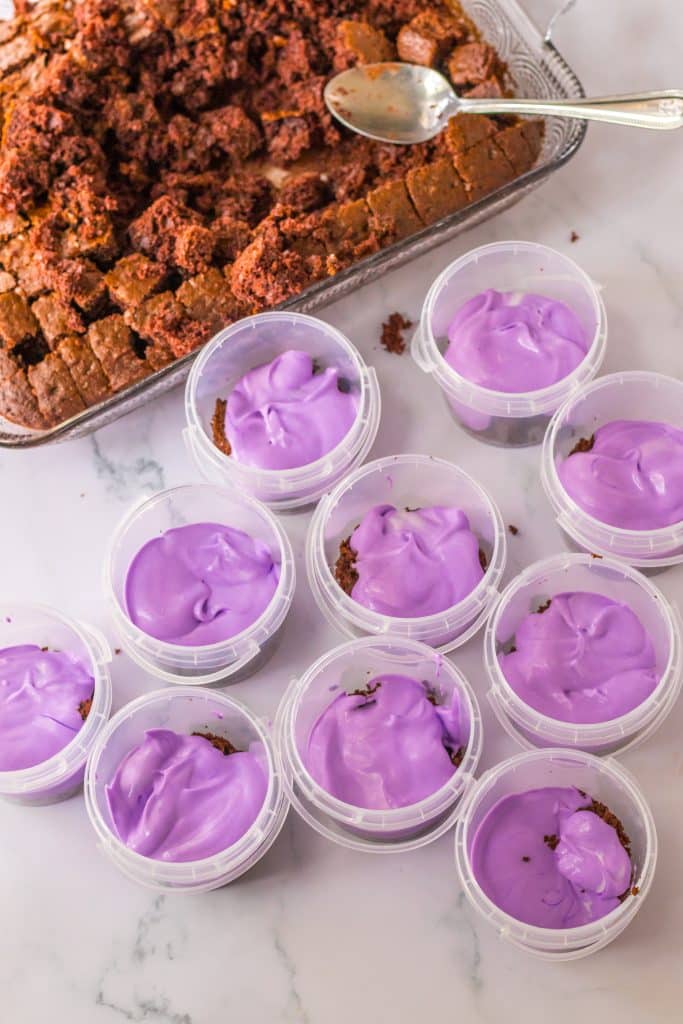
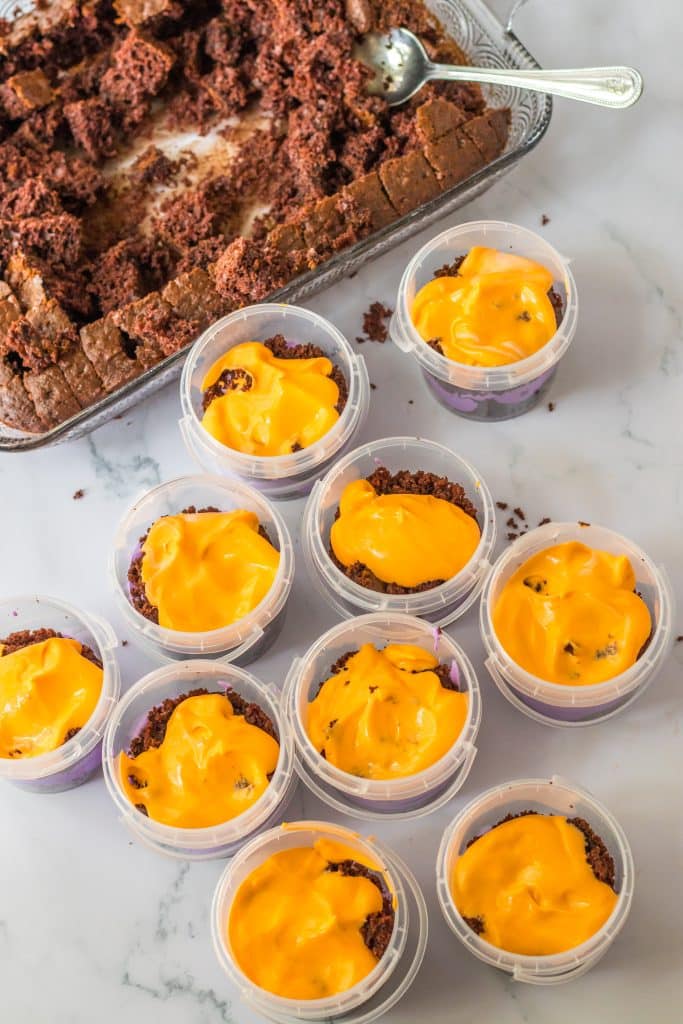
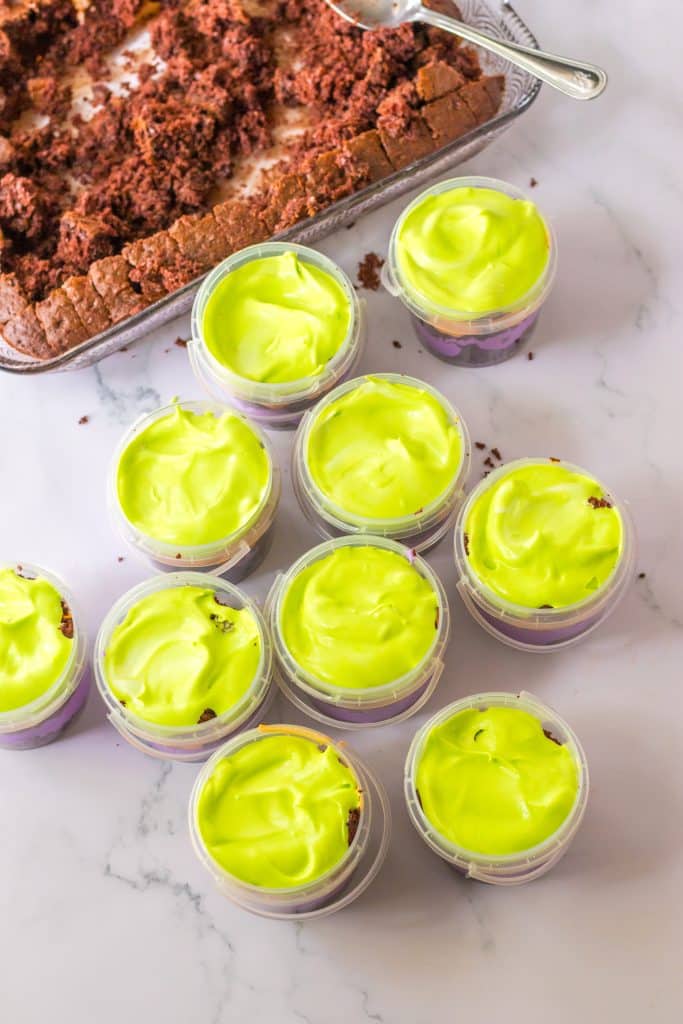
Start to assemble the cups by layering the cake and pudding.
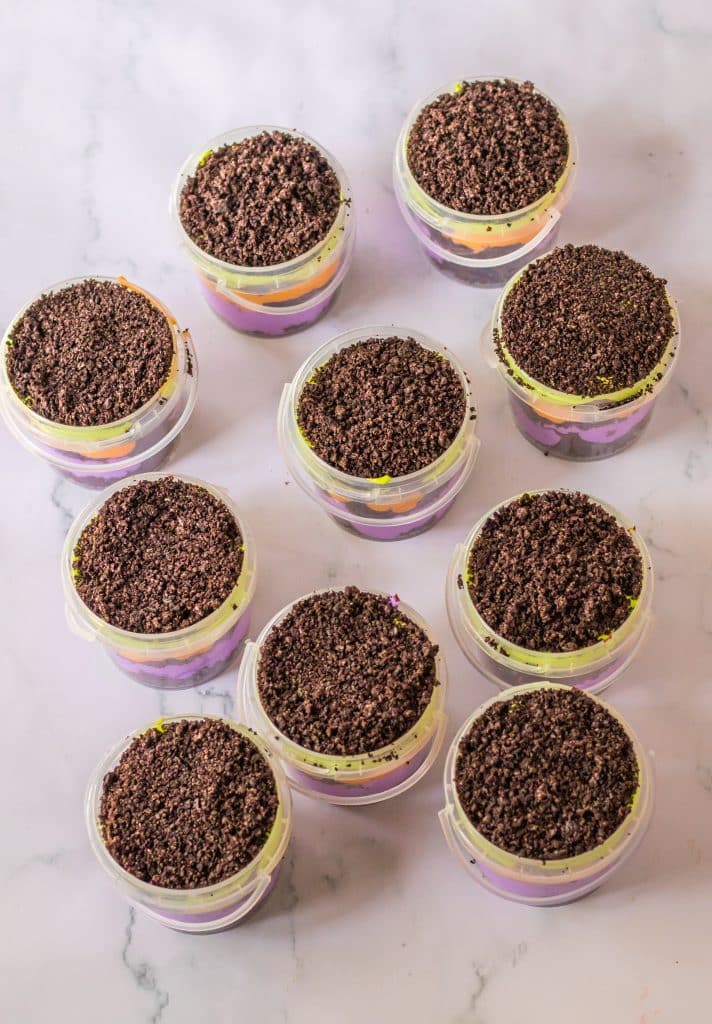
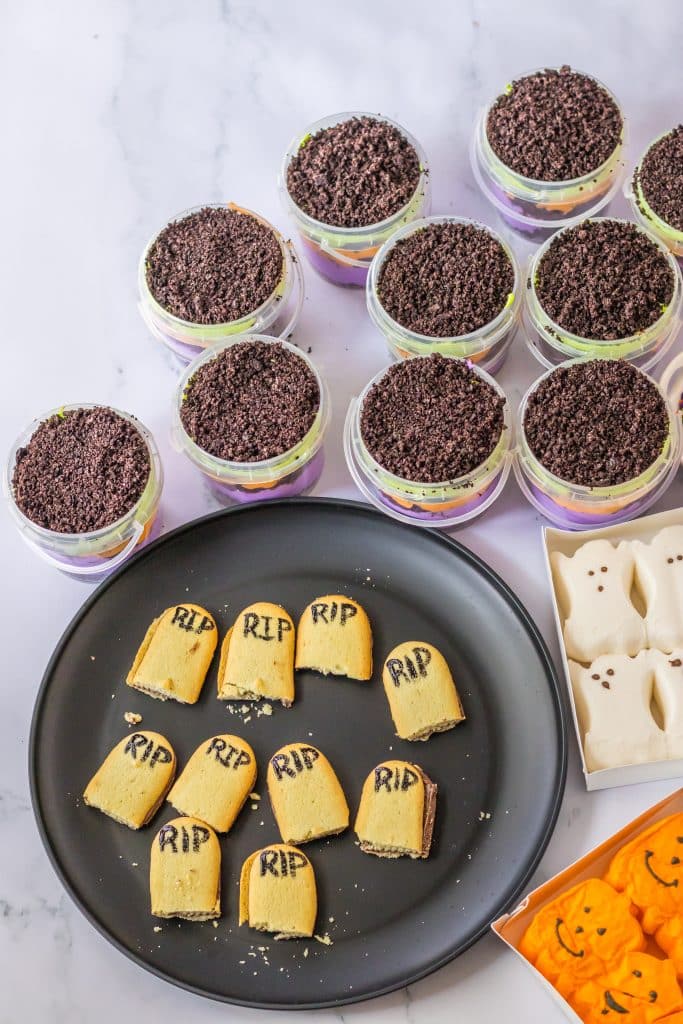
Top with crushed cookies to mimic dirt.
Make some cookie gravestones and assemble.
FREQUENTLY ASKED QUESTIONS
Can I use any cake?
Yes, you can make the cake like in the recipe, or you can save time and use a store-bought cake or pound cake.
Can I serve this in something else besides buckets?
Of course! I also like to use the clear disposable 9 ounce cups. They are perfect for seeing all the layers. I used these little buckets and they were perfect! Get them here —> Buckets
Can I use any pudding?
Yes you can use any flavor, I suggest using the white chocolate flavor or vanilla because they dye the best but you can use cheesecake flavor too.
INGREDIENTS USED
- Box devils food cake – You can use any chocolate cake mix but I used Devils Food because its spooky season.
- Water, oil and eggs the box calls for – Each bake mix brand varies so use what your cake mix calls for.
- White chocolate instant pudding – You can also use cheesecake or vanilla but I find the white chocolate is the easiest to dye.
- Milk – Use your favorite mik to make the pudding with.
- Whipped topping – You will need 2 containers of the whipped topping thawed.
- Neon green, orange and purple food coloring – You can use any Halloween color combo you like, I like to use the neons.
- Oreo cookies – These are to mimic the dirt so make sure to get chocolate ones.
- Milano cookies – These are what I use to make the gravestones, you can buy candy gravestones or make your own like I did.
- Halloween candy and sprinkles for decor – You can decorate these with anything you like.
- 10 (8 ounce) clear buckets – I get these little slime buckets from Amazon.
How to make Graveyard Pudding Cups
- Preheat your oven to 350 degrees.
- In a large bowl combine the cake mix and the water, oil and eggs the box calls for.
- Pour the cake batter into a prepared 9×13 baking dish.
- Bake for 30-35 minutes or until a toothpick inserted comes out clean.
- Slice into bite size squares.
- Set aside to cool.
- Meanwhile prepare the pudding.
- Combine the pudding with the milk and whisk.
- Fold in the whipped topping.
- Separate the filling to 3 bowls and color each bowl with one of the food colorings.
- Into your buckets place a little of the cake.
- Next a layer of one of the puddings.
- Repeat the layers so you have 3 layers of pudding, each a different color.
- Top each one evenly with the cookie crumbs.
- Cut the bottom of the Milano cookie off.
- Using food coloring and a little paint brush you can paint on the cookies R.I.P and such.
- Decorate the buckets with the gravestones, candy and sprinkles.
- Refrigerate for an hour.
- Serve!
Want more Halloween desserts? Check these out!
- Stuffed Black Velvet Cookies
- Ghost Jello Shots
- Ghost Hi Hat Cupcakes
- Pumpkin Cookie Truffles
- No Bake Pumpkin Lush
- Chocolate Covered Oreo Spiders
Graveyard Pudding Cups
Ingredients
- 1 (15.25 ounce) box devils food cake
- Water, oil and eggs the box calls for
- 2 (3.4 ounce) boxes white chocolate instant pudding
- 4 cups cold milk
- 8 ounces whipped topping
- Neon green, orange and purple food coloring
- 1 ½ cups crushed oreo cookies
- Milano cookies
- Halloween candy and sprinkles for decor
- 10 (8 ounce) clear buckets
Instructions
- Preheat your oven to 350 degrees.
- In a large bowl combine the cake mix and the water, oil and eggs the box calls for.
- Pour the cake batter into a prepared 9x13 baking dish.
- Bake for 30-35 minutes or until a toothpick inserted comes out clean.
- Slice into bite size squares.
- Set aside to cool.
- Meanwhile prepare the pudding.
- Combine the pudding with the milk and whisk.
- Fold in the whipped topping.
- Separate the filling to 3 bowls and color each bowl with one of the food colorings.
- Into your buckets place a little of the cake.
- Next a layer of one of the puddings.
- Repeat the layers so you have 3 layers of pudding, each a different color.
- Top each one evenly with the cookie crumbs.
- Cut the bottom of the Milano cookie off.
- Using food coloring and a little paint brush you can paint on the cookies R.I.P and such.
- Decorate the buckets with the gravestones, candy and sprinkles.
- Refrigerate for an hour.
- Serve!
Notes
- Store leftovers in the refrigerator for up to 3 days.
- You can use vanilla or cheesecake pudding if you like.
- Decorate with little gummi worms or candy skulls too, anything to make these spooky.