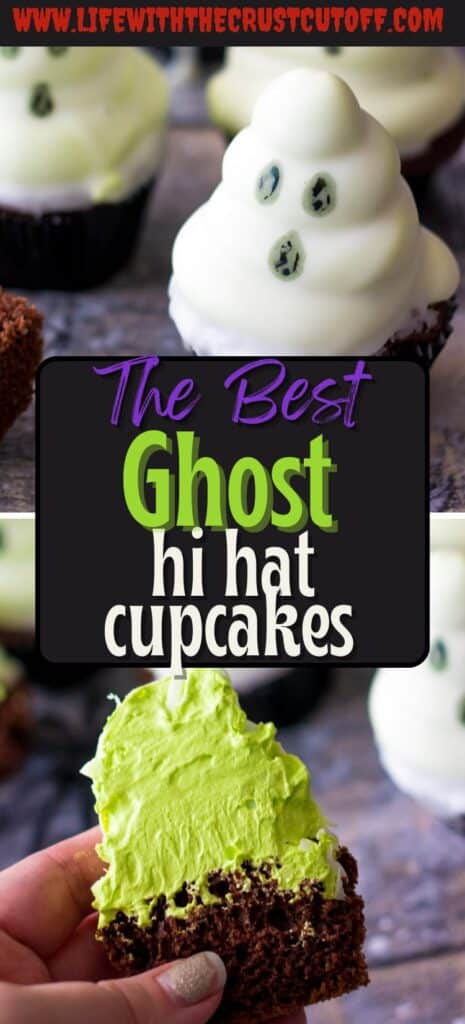
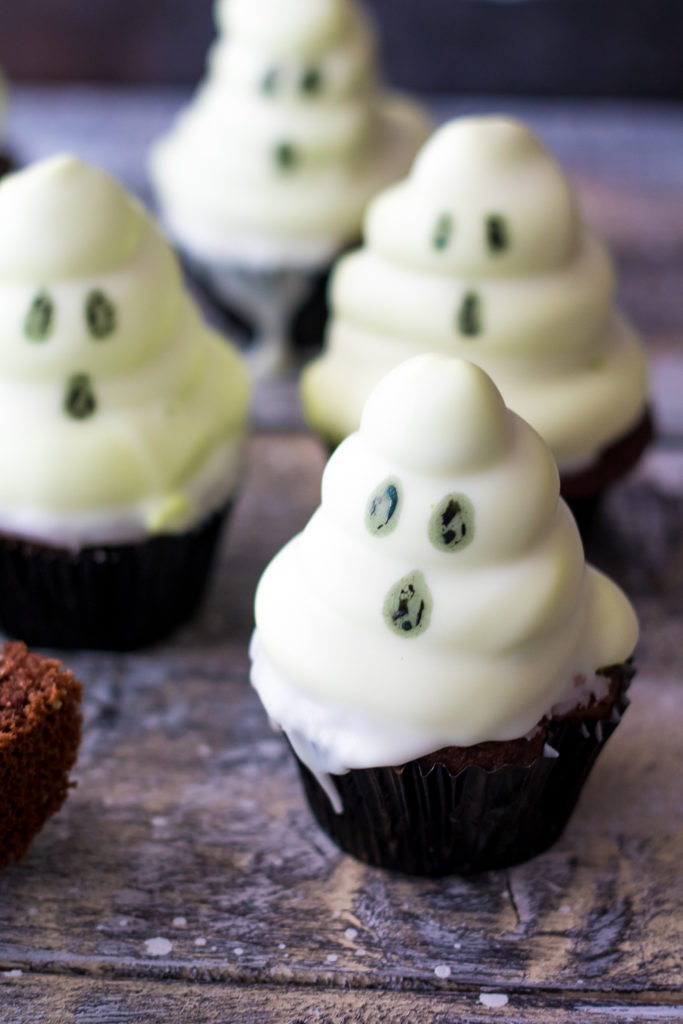
Ghost Hi Hat Cupcakes
Hi-Hat Ghost Cupcakes are a spooktacular Halloween dessert sure to make all your little ghosts and goblins scream this Halloween!
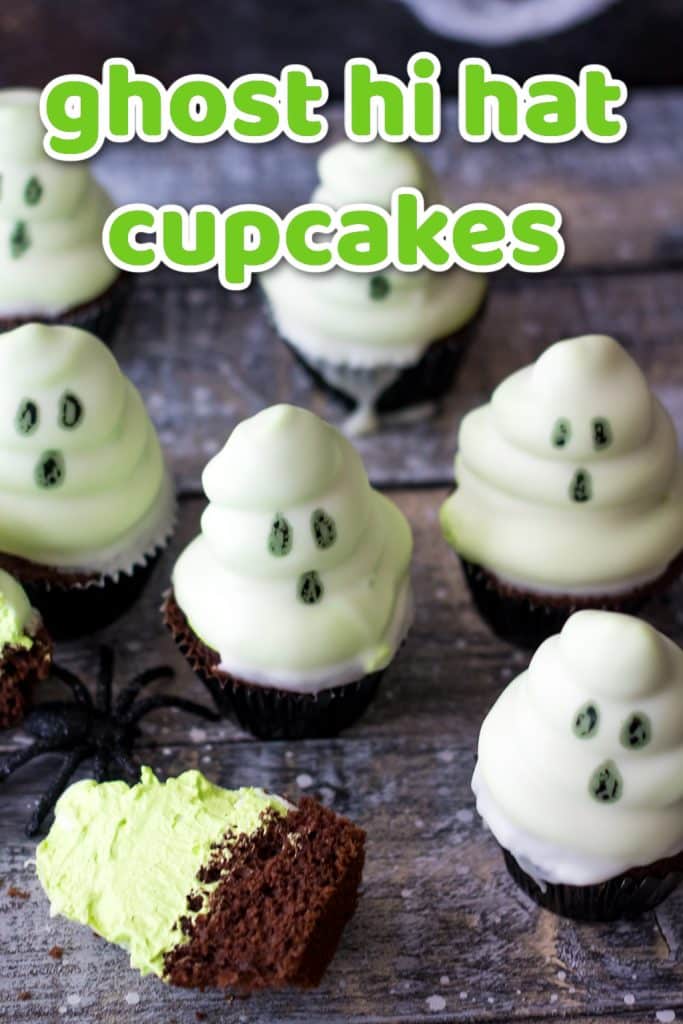
Ghost Hi Hat Cupcakes have a fun surprise inside!! Bite into the spooky ghosts to reveal a green marshmallow frosting inside! So much fun!
Hi-Hat Cupcakes can be intimidating, they intimidate me but I promise with this recipe and a few tricks you too will be able to make these show stopping cupcakes.
Hi-Hat Cupcakes if you’ve never had one are delicious cupcakes topped with a light and airy marshmallow frosting that gets piped on high and then dunked in chocolate creating a thin crunchy shell that when bitten into reveals the fluffy frosting.
I start my Hi-Hat Ghost Cupcakes with a boxed Devil’s Food cake mix. Now you can certainly make cupcakes from scratch but because the main attraction is the frosting and because it can be a little scary I take the easy way and just use a box mix for the cupcake base.
So just whip up any flavor cupcakes you like, bake them and let them cool. They need to be 100% cool for this recipe to work.
The frosting is fairly easy to make, there is some stirring over a double boiler but then after that your stand mixer does the rest of the work. The frosting does need to whip for between 15-20 minutes, so catch up on some TV or read a magazine while it does the hard work for you.
I do not have a special piping bag or tip for these. I just fill up a ziploc bag and snip of the end and pipe it high.
Traditionally Hi-Hat Cupcakes have a white frosting and are then dipped into milk or dark chocolate. I loved the look of the green inside these spooky white ghosts. They are so perfect for Halloween!
Ingredients used –
- Granulated Sugar – You need this for that marshmallowy frosting.
- Egg Whites – Be sure to not get any yolk in with the whites so they whip up nice and fluffy.
- Cream of Tartar – This helps your egg whites get stiff.
- Vanilla Extract – For flavoring, but you can switch it out for your favorite flavoring.
- Green Food Coloring – I like to use the neon green food coloring.
- White almond bark – This is for dipping the cupcakes and I prefer the almond bark over white chocolate chips, they do not melt as well.
- Oil – Helps the almond bark stay nice and loose for dipping.
- Black Food Coloring – To paint on their little ghost eyes.
- Chocolate Cupcake Mix – Go ahead and prepare these according to box directions.
Directions –
FROSTING:
In the bowl of an electric mixer, whisk together the sugar, egg whites, water and cream of tartar.
Set the bowl over a pan of barely simmering water and whisk until sugar is dissolved about 10 minutes.
Transfer the bowl to a stand mixer fitted with a whisk attachment and beat on high speed until the frosting forms stiff peaks, about 12 to 16 minutes.
Add the vanilla extract and coloring and beat until combined.
Transfer the frosting to a large ziploc bag and snip off the corner. Pipe a high swirl of frosting onto the top of each cupcake.
Transfer the cupcakes to a baking sheet and place in freezer for an hour while preparing chocolate for dipping.
DIPPING CHOCOLATE:
Combine the chocolate and oil in a medium heat-proof bowl set over a saucepan of barely simmering water and stir until melted and smooth.
Transfer to a coffee mug, deep cup or 4 cup measuring cup and cool to room temperature.
Holding each cupcake by its bottom, quickly dip each cupcake into the chocolate to coat the frosting, and place on a wire rack.
Once chocolate has hardened using a small paintbrush or Q-tip dip into black food coloring and dot on the eyes and mouth.
Refrigerate for 2 hours before serving.
Cupcakes can be refrigerated for up to 3 days.
Can I substitute the cream of tartar?
No. This ingredient is absolutely essential to making these successfully. The cream of tartar helps stabilize the marshmallow frosting and is what helps it be stiff enough to dip.
Do I have to put these in the freezer to chill?
I would not skip this step. Many recipes do not call for popping your piped cupcakes in the freezer, but I have never tried without freezing them first. I also have never had any trouble with my frosting deflating or melting during the dipping portion.
Do I have to add oil to the chocolate?
Yes. The oil helps the chocolate to be a little thinner, so it’s not so heavy and weigh down the frosting, which can deflate the frosting, melt it or suck it down into the chocolate while dipping. The oil also helps the chocolate stay a little softer making the cupcakes easier to bite into.
Once you make these cupcakes you will feel like a rock star or a superhero because anyone who can turn a cupcake with mile high frosting upside down, dip it into chocolate and then successfully right it must be magic! Trust me though it is easy peasy and not as difficult as it sounds or looks. Just a few tricks make these fool proof and fail proof. That being said every time I make Hi-Hat cupcakes I lose at least one, that’s just how it goes lol.
So this Halloween make them a treat that will beat any trick or treat candy with these Hi Hat Ghost Cupcakes!
For more Spooky Treats check these out
Happy Halloween!

Ghost Hi Hat Cupcakes
Ingredients
- 1¼ cups granulated sugar
- 3 egg whites (at room temperature)
- ¼ cup water
- ¼ teaspoon cream of tartar
- 1½ teaspoons vanilla extract
- neon green food coloring
- White almond bark
- 1 tablespoon oil
- black food coloring
- 12 chocolate cupcakes
Instructions
FROSTING:
In the bowl of an electric mixer, whisk together the sugar, egg whites, water and cream of tartar.
Set the bowl over a pan of barely simmering water and whisk until sugar is dissolved about 10 minutes.
Transfer the bowl to a stand mixer fitted with a whisk attachment and beat on high speed until the frosting forms stiff peaks, about 12 to 16 minutes.
Add the vanilla extract and coloring and beat until combined.
Transfer the frosting to a large ziploc bag and snip off the corner. Pipe a high swirl of frosting onto the top of each cupcake.
Transfer the cupcakes to a baking sheet and place in freezer for an hour while preparing chocolate for dipping.
DIPPING CHOCOLATE:
Combine the chocolate and oil in a medium heat-proof bowl set over a saucepan of barely simmering water and stir until melted and smooth.
Transfer to a coffee mug, deep cup or 4 cup measuring cup and cool to room temperature.
Holding each cupcake by its bottom, quickly dip each cupcake into the chocolate to coat the frosting, and place on a wire rack.
Once chocolate has hardened using a small paintbrush or Q-tip dip into black food coloring and dot on the eyes and mouth.
Refrigerate for 2 hours before serving.
Cupcakes can be refrigerated for up to 3 days.
Notes
- Use a heaping 1/4 teaspoon of cream of tartar in frosting.
- Make sure the cupcakes are completely cool before piping on frosting.
- Let your stand mixer do the work of whipping the frosting for close to 20 minutes. Do not be scared to let it whip it this long, it needs it to work!
- A little oil in your dipping chocolate is essential for smooth dipping.
- The dipping chocolate needs to cool to room temp before dipping.
- Make sure your dipping chocolate is in a tall cup, or a coffee mug, a measuring cup, so you can dip the cupcake straight down and coat it evenly.
- After piping the frosting on let the cupcakes hang out in the freezer for an hour just to make sure those little frosting hats stay on.